So, most of you don't know that I play golf. Not a lot, but a bit, and not extraordinarily well. Just enough to get me around without embarrassing myself! One day I will make myself a pinup appropriate golfing outfit like this one:
In fact I have the patterns and the fabric, I just haven't gotten around to doing it...
Anyway! Until that day I keep getting given shirts like this one when I play in corporate days:
Now what shapely young woman like myself would want to wear something like this? Not me!
So, in the spirit of adventure, I decided to pull it apart and remake it in a way that would fit my curves. I started by cutting out the sleeves and down the side seams. I wanted to leave the shoulder seams and collar etc intact because there was NO WAY I wanted to attempt to put that bit back together.
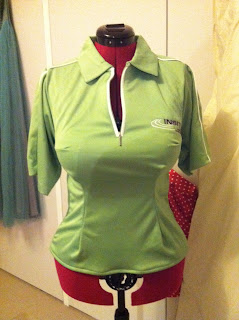
Then I put it on my headless helper and made some darts:
And while I was at it, I marked where the point of the shoulder was, cause I didn't want a fitted polo shirt with saggy sleeves!
Then I sewed up the new darts, and re-drew the arm holes using the new shoulder point:
Then I sewed the sleeves back in, trying really really hard to match the white piping on the shoulder:
And then I chopped about 3 inches off the length, and made a new hem. And the new polo shirt looks like this:
Much better!!!
Stay tuned tomorrow to my facebook page, where I will be posting a photo of me wearing my new, now fitted shirt, out on the golf course. Fingers crossed my team wins!
Now, on a different note, I cut out the pieces for my shirtwaister on the weekend, and all the thinking about the way to lay the stripes got me thinking about the button holes... how was I going to work the stripes with the bound button holes?
The stripes on the bodice and the skirt run vertically, and the stripes on the collar and sleeve cuffs run horizontally. I didn't really want to do horizontal stripes on the button holes cause one lip will be one colour and one will be another colour, which could look weird. I thought I might be able to do vertical stripes like the bodice, but have them a different colour to the stripes on the bodice. But then I thought why not do them diagonally? So I made a test one:
Looks pretty cool, huh!
So the other thing I noticed when I did this test, was that I'm going to need to line my fabric with something. This fabric is very light, and therefore a bit sheer. So it needs something equally as light so it has a similar drape but isn't so sheer. Thankfully I think I have just enough of a lightweight white cotton sheeting to do the trick!
Looks good with the button anyway!
Wish me luck tomorrow!!!
Beccie
xxx


I love what you did with the golf shirt! It looks amazing now!
ReplyDelete